

RAMP: Frequently Asked Questions
RAMP is licensed under the [GPL v2].
Yes – we are happy to partner with WordPress hosting providers that are interested in including RAMP in their offerings. Since our standard packages do not include reselling, we create a special arrangement to support these hosting partners. These are typically customized to take into account: 1. Who provides front-line customer support for RAMP issues? 2. Can the customer take the RAMP plugin with them if they leave the hosting partner? 3. The hosting partner’s specific business needs. A common set-up is to treat these plans like mobile phone plans: – 2 year commitment – 40 sites = $600/month with a $20/site fee for sites over 40 – 100 sites = $1200/month with a $17/site fee for sites over 100 – 250 sites = $2500/month with a $12/site fee for sites over 250 You can upgrade or downgrade the plan at any time during the 2 year commitment, the change is effective in the following billing cycle. Payment is collected monthly. If this sounds like a good fit for your needs, please get in touch.
By default RAMP is only available to administrator users. You can adjust permission levels so that RAMP is available to editors and above. Add a filter on ramp-user-access-base to change the capability required for access to RAMP. By default, RAMP requires manage_options; change this to publish_pages to allow access to editors and above (see the Codex capability list). For example, you might add this to your theme’s functions.php:
function ramp_user_access_filter($level) {
    return('publish_pages');
}
add_filter('ramp-user-access-base', 'ramp_user_access_filter');
What does this plugin do?
Corrects duplicate GUID values created with versions of WordPress that exhibited a non-unique GUID bug. If you used WordPress 3.0.x or earlier on your site, run this plugin to fix potential bad data that might prevent RAMP from working correctly. There were earlier versions of WordPress pior to 3.1 that created non-unique GUIDs in the post table. The bug that initially caused this problem is fixed, but the bad data persists in many WordPress installs. The GUID Fix plugin can be run to fix the non-unique GUIDs in the post table. Note: The GUID Fix should be run on your production database, then any staging/dev environments recreated from the corrected production environment.
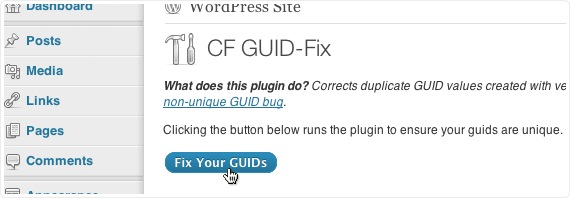
How do I use the GUID Fix Plugin?
- Download the latest version
- Install the plugin to your plugins directory
- Activate the Plugin
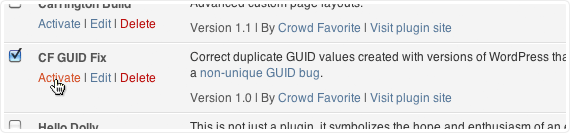
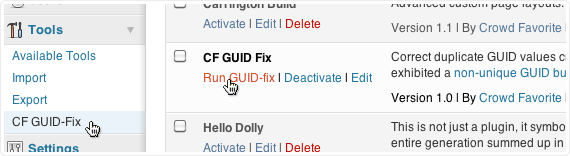
- Click on the “CF GUID-Fix” link under the “Tools” menu or “Run GUID-Fix” from the Plugins list page.
- Click on Run GUID-fix
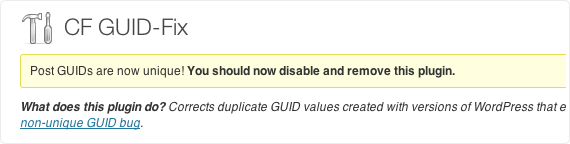
- You will receive a confirmation “Post GUIDs are now unique! You should now disable and remove this plugin.”
- After GUID Fix has been successfully run it is not recommended to run the plugin again and should be removed from your plugin directory.
If the plugin is not able to update the duplicate GUIDs you will receive an error message that will need to be addressed before running again.
Once you have run the GUID fix, you will need to re-create any staging or development environments from your production environment before using RAMP again (otherwise RAMP may not know what pages and posts should be connected to each other).
Installation must be complete before attempting to send a batch. If you try to submit a new batch without these settings entered correctly, you will receive this error message.
Comments are not supported as part of the RAMP process. If we receive information about use cases that require the ability to push comments as part of a batch, we\’ll consider this for a future release.
- Single Site edition – includes support for a single website (which includes the production server and as many staging / developement / testing environments as you like for that website).
- Developer Edition – includes support for unlimited websites.
If you only want to use RAMP for two or three websites (and don\’t wish to purchase the Developer Edition), please purchase a copy for each site.
We have not done any testing with WPML, however we have been told by our customers that RAMP can work with WPML, but that you must toggle the language dropdown to select each language that has changes, then create and send a batch in each language. This is due to the way WPML’s code makes changes to how RAMP works (via hooks in the standard WordPress SQL process). We hope that a future version of RAMP will be something that the WPML team can build compatibility with, but do not have any timeline for this.
You\’ll want to permanently delete the post/page in both the staging and production environments. RAMP currently does not handle pushing \”deletes\” as part of a batch.
No. At least, not out of the box. The RAMP process makes changes to your production website and provides handy one-click rollback functionality in the event something goes wrong. We see this as a process best attended by a human that can make decisions in the event something wonky happens (network connection failure, content not displaying as expected, etc.) – perhaps deciding to log into the production server and clicking that rollback button. Theoretically the RAMP process could be automated. And perhaps an email could be sent to the server admin with the results of the batch (and a link to the rollback, etc.). This would require extending RAMP to add these features. If you’re interested in this, it’s something we’d be happy to explore as a consulting project.
Yes, RAMP includes custom field data in the batch process. Custom fields are transferred “as-is” with the exception of known core WordPress custom fields like the ones used for featured images. For this field, RAMP smartly translates the attachment ID so that it can be properly associated when the batch is received. RAMP does not automatically attempt to translate any unknown fields content, so if you have custom fields that are referencing post IDs, etc. you will want to use our plugin to do this or extend the RAMP process to make sure they are translated as desired.
RAMP provides a framework for plugins and themes to \”opt-in\” to the RAMP process. For example, our own Carrington Build product includes code to enable its data to be cleanly transferred using RAMP. The reason that this is not done automatically for all option data is that RAMP cannot accurately guess at what changes might be needed to the data. For example, if a value is the ID of a post/page/category term/etc. then it needs to be translated to the ID of the matching item on the production server. The data can be in various serialized formats, etc. The process of RAMP-enabling a plugin and/or theme is pretty straight forward and we have some example code you can get started with. We also have a plugin for translating post IDs in custom fields.
Technically, yes. However we do not recommend this as it\’s possible to get the two out of sync and into a situation where you\’d have to do a full re-sync of content (outside of RAMP) in order to get going with RAMP again.
Yes. When information about attachments is sent to Production, that server then pulls the files from the Staging Server.
AMP does not automatically make changes to any of the content (such as converting URLs from staging to production) in your posts/pages when migrating them as RAMP cannot accurately “guess” what should be done in all situations. This also applies to URLs in custom fields, etc. URLs that are programmatically generated (archives links, etc.) will always produce the correct URLs based on the base URL entered for each site. We have created a plugin that converts URLs in content as part of the batch process; this download is available from your account page. Please also see our documentation on using relative URLs.
With your purchase of RAMP you receive 1 year of access to our support forums, end-user and developer documentation.
Yes, RAMP is compatible with WordPress Multi-Site. RAMP sees each instance of a WPMS install as a separate site, so you could have a situation where your staging and production instances are on the same WPMS install, or you could use RAMP to push content between instances on separate WPMS installs.
RAMP will push attachments as part of pushing a post, page, or custom post type. Any media file attached to a post, page, or custom post type will be sent when that page is part of a batch. Technically, it works like this:
- the URL(s) of the attachment(s) are sent in the batch
- the files are then pulled from staging to production as part of the RAMP process (on the receiving end)
RAMP does not currently push unattached media files (things uploaded directly to the media library) due to a limitation in the way WordPress core tracks revisions/changes to these files.
Yes! If you are a Single Site RAMP customer you can upgrade to Unlimited Sites by paying the difference between the two offerings. The link to upgrade is available on your Account page.
Yes. The easiest way to do this is:
- Change the email address on your account to your client\’s email address
- Cancel the recurring subscription to RAMP, your client can re-activate it with their billing information
- (optional) Notify us of the client\’s name, and we can apply that change to the account